Once a Primary Contact for a new Collaborator has been added (with associated plans), you’ll need to add Team Members.
Adding a Team Member
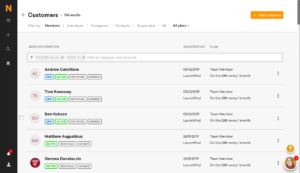
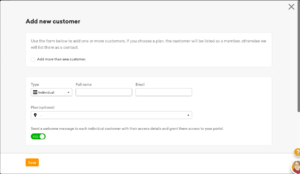
If there isn’t already a Member record for this person, create one by clicking on the Add Customer button found at the top of the Customers form accessed via ‘Members & Contacts’ in the Operations section.
Complete the following sections:
Top Section
Change the ‘Type’ to Company to display the ‘Company Name’ field.
Add the company name (without the P/L) – if adding multiple members, try to make the name the same.
Insert the Collaborators Fullname in the ‘Primary Contact’ field.
Add their Email address – this must be unique.
Teams
Select the Team for this member. If their Team doesn’t yet exist, click on ‘Add…’ to open the add team form (see Related Articles below).

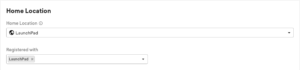
Home Location
Set the Home Location to LaunchPad.
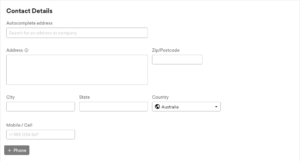
Contact Details
If they have provided home address details, add these here.
Add their Mobile number – this is important as the sign-in tablet system sends text messages when guests arrive.
Billing Details
For the Billing Member (there must be one per company), add their address that will appear at the top of invoices.
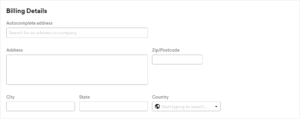
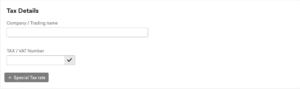
Also, for the Billing Member, add the Tax Details (legal Company Name) and ABN as the Tax Number.
Other Details
Set Relationship to LP to either Primary Contact or Active Collaborator.
Fill in the LP Site Field – 0 – virtual business, 2 for Create, 3 for Evolve, 4 for Orbit.
Set Create User to On.
Make a note in the Keys field if the Member has been given a cupboard key.
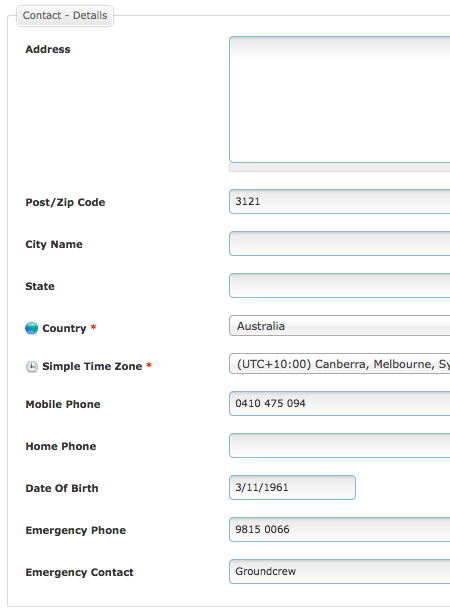
Contact – Details
Set Post/Zip Code to the Member’s home postcode.
Country to Australia and Simple Simple Time Zone to ‘(UTC:+10:00) Canberra, Melbourne Sydney’.
Mobile Phone to the Members phone number.
Date of Birth to their birth date.
If they have provided Emergency contact details, add them to the Emergency fields.
Adding other details
Click on Save to add the member – now open the new member record to add some additional details.
Type the name into the ‘BASIC INFORMATION’ search box to find the member.
Click on their name to open the record and under Account, open the Profile tab.
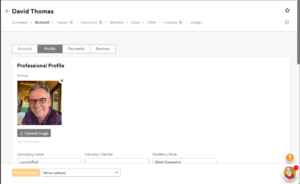
Demographics
Select their Gender and fill in the Date of Birth field (so we can send them a card).

Completing the process
Click on Save Changes to update the record.
You’ll need to activate the new members account and send them a Welcome Email.

Under More Options, select Activate Account. Then select Send Welcome Email – Your all done!
Removing Team Members
They are no longer employed by the company
Employee
If the member is an employee of the company:
- Confirm that the Plan is a ‘Team Member’, if not you’ll need to confirm that the plan is no longer required
- If the Plan is required, reassign the plan to another Team Member
- Confirm that there are no future room bookings or automatic repeat bookings in this members name. If there are, delete them and email the Primary Contact of the change
- If a swipe tag has been allocated to the member (Check the security system), request it’s return and disable in the Security system
- Disable (make Inactive) the old member – this ensures past invoices have been retained.
Billing Member
All companies must have a billing member for invoicing:
- Contact the company and request an alternative Billing Member for invoicing
- In the Teams record, change the billing member is updated to the new billing member
- Update the Billing Information for this new billing member – use the old member’s details as a guide
- Confirm that there are no future room bookings or automatic repeat bookings in this members name. If there are, delete them and email the Primary Contact of the change
- If a swipe tag has been allocated to the member (Check the security system), request it’s return and disable in the Security system
- Disable (make Inactive) the old member – this ensures past invoices have been retained.
The company has left LaunchPad
Follow the ‘Exit Procedure’ for removing the entire company from Nexudus.